
 Inside the Briefcase


How to Create Professional ID Photos for Work
May 2, 2024 No Comments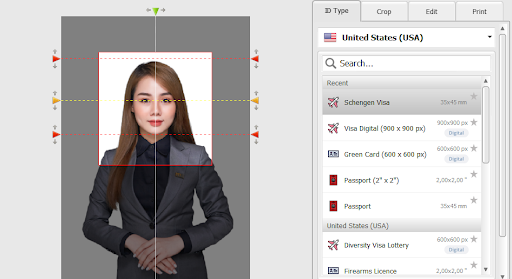
If you’re in charge of many employees or run a business, you might often have situations where you need to quickly create ID photos for the employees. For example, they might need to apply for a visa for an international business trip, a photo ID for entering the office, or a pre-designed name badge with a picture for a conference or meeting.
In today’s digital world, it might also be necessary to show your team online, be that a website or a LinkedIn page. To maintain a professional look, it’s better to prepare high-quality ID photos.
Want to learn more about making ID photos for work-related purposes? Then keep reading this guide. You’ll discover some essential tips for capturing pictures. We will also show you the process step by step using a beginner-friendly ID photo maker. So, let’s begin right now.
Tips to Take Good ID Photos
These are some tips that will help you shoot perfect headshots. Let’s see how you can take an ID photo.
1. Consider the Background
The background of your ID photo should be plain and uncluttered. If there’s no backdrop available, you can take a picture in front of a blank wall.
2. Use the Right Camera
While smartphones these days have impressive camera capabilities, it’s still advisable to use a dedicated camera for ID photos. A good quality camera will capture more detail and produce a sharper image. If possible, use a camera with a high resolution to ensure clarity and sharpness.
3. Fix the Lighting
Lighting plays a crucial role in capturing a great ID photo. Avoid harsh overhead lighting that can cast unflattering shadows on a person’s face. Instead, opt for soft, diffused lighting that evenly illuminates the face. Natural light is often the best option, so try to take photos near a window during daylight hours.
3 Steps to Make an ID Photo
After capturing the perfect shot, it’s time to edit and retouch the ID photos. However, be cautious not to over-edit the photo, as it may result in an unnatural and unprofessional appearance. Retouching should be minimal, focusing on subtle adjustments that enhance the person’s features while maintaining their authentic appearance.
Creating an ID photo is a breeze if you have an easy-to-use program at your disposal. For example, you can prepare pictures with Passport Photo Maker, dedicated software for making ID photos on a PC. Here, you can prepare photos for various documents for different countries, like Schengen Visa, driving license, and so on. It also has a handy cropping tool for tweaking an image in a few clicks.
The passport photo software also lets you edit images by changing the background, sharpening the picture, and fixing the red eye effect. This is how you can make ID photos for work using Passport Photo Maker:
Step 1. Crop Your Picture
If you’re making a photo for a document, choose the needed country and document from the drop-down menu. If you need it for a different purpose, switch to the Crop tab right away. Drag the handles to select the top of the head, eyes, and other features. Then click Next.
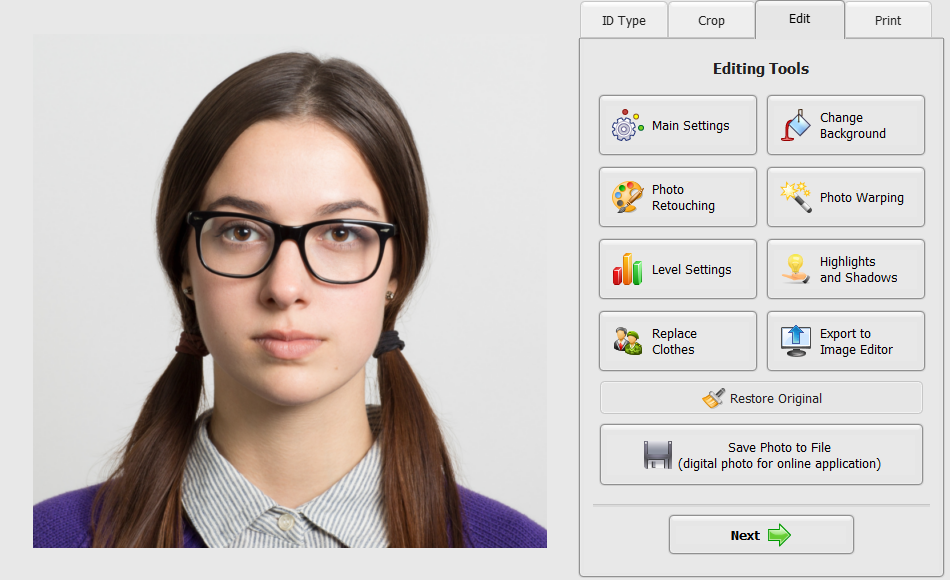
Step 2. Edit the ID Photo
Open the Edit tab to make changes to your picture. In the main settings, you can adjust brightness, contrast, and saturation. You can also click Photo Retouching to sharpen the desired areas of the image, make some parts blurry, fix the red eye effect, etc. To correct the background, hit the Change Background button and select the required color.
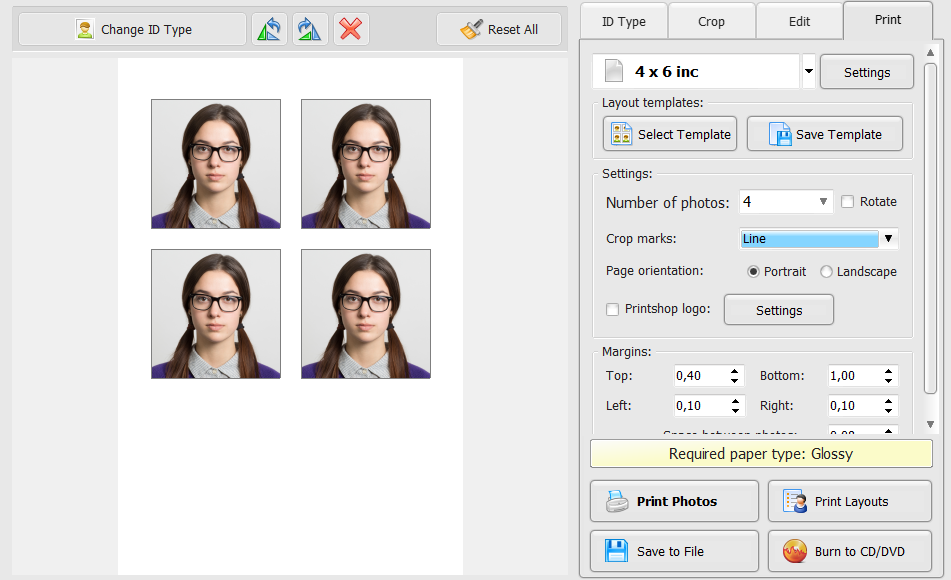
Step 3. Print Your ID Photos
In the Print tab, you can customize the printing to your liking. The printing module lets you adjust margins, crop marks, orientation, number of images, and so on. There are also ready-to-use templates. But you can also save the project to print ID photos at a print shop later.
Conclusion
This is it. Now you know how you can create ID photos for various occasions, including visa applications and preparing photo ID cards for employees. As you can see, creating high-quality pictures for your business is essential for establishing a strong brand image. In this article, we have talked about the process step by step. You’ve discovered some shooting tips and a tutorial for editing an ID photo. Follow this link to find out more about one of the best programs you can use for this job – Passport Photo Maker. With this tool at hand, you can make professional-looking photos for your business in just a couple of clicks.
However, you should plan everything ahead and use a high-quality camera to achieve better results. With a little effort and attention to detail, you can easily create ID photos that contribute to the overall success of your business.


Sorry, the comment form is closed at this time.